配置组托管服务帐户 (gMSA) 对 Session Recording 的支持
Session Recording 支持组托管服务帐户 (gMSA),以简化在多台服务器上运行的服务的服务主体名称 (SPN) 管理。 此功能增强了安全性并简化了服务帐户的管理。
步骤 1:在域控制器上创建 gMSA
注意:
本部分内容介绍如何使用域控制器上的服务器管理器创建 gMSA。 或者,您可以运行以下脚本来实现相同的目的:
  Add-KdsRootKey -EffectiveImmediately
  Install-WindowsFeature -Name RSAT-AD-PowerShell
  NEW-ADGroup –name "gMSA"  –path "DC=ajj,DC=test" -GroupCategory Security -groupscope Global
  Add-ADGroupMember "gMSA" -Members "Server-3$"(The dollar sign $ is must)
  New-ADServiceAccount IIS1SvC -DNSHostName IIS1Svc.ajj.test -PrincipalsAllowedToRetrieveManagedPassword gMSA
<!--NeedCopy-->
有效时间参数为密钥在使用前传播到所有域控制器 (DC) 留出时间。 使用 Add-KdsRootKey -EffectiveImmediately 将根密钥添加到目标 DC 以供密钥分发服务 (KDS) 服务立即使用。 但是,其他域控制器在复制完成之前将无法使用根密钥。
-
在域控制器上,打开 Active Directory 管理中心。

-
选择域并创建一个组。

-
命名组(使用 gMSA 作为示例)。 将组类型设置为安全,将组范围设置为全局。 向其中添加成员服务器。 成员服务器包括安装了 Session Recording Server 和 Session Recording 数据库的计算机。

例如,请按如下所示添加一个组成员:

-
成功添加安全组后,可以使用 Active Directory 管理中心中的全局搜索进行搜索。 可以查看成员服务器,并记得重新启动所有成员服务器。

-
使用 New-ADServiceAccount PowerShell cmdlet 创建 gMSA 帐户。
在域控制器上,打开 Windows PowerShell 并运行以下命令以创建 gMSA:
  New-ADServiceAccount $serviceAccountName -DNSHostName $DNSHostName -PrincipalsAllowedToRetrieveManagedPassword $groupName
<!--NeedCopy-->
其中,
-
$serviceAccountName 指定 gMSA 的名称。 本文以 IIS1SvC 为例。
-
$DNSHostName 指定 DNS 主机名,格式为 $serviceAccountName 后跟域控制器的域名。
-
$groupName 指定允许检索托管密码的组。 本文以 gMSA 为例。
-
步骤 2:在每个成员服务器上安装 gMSA
必须在每台将使用 gMSA 的服务器上安装 gMSA。
-
使用服务器管理器或具有管理权限的 PowerShell 安装 Windows PowerShell 的 Active Directory 模块。
-
使用服务器管理器的示例:

-
如果您使用具有管理权限的 PowerShell,请运行以下命令:
   Install-WindowsFeature -Name RSAT-AD-PowerShell
 <!--NeedCopy-->
-
-
打开 Windows PowerShell 并运行类似于以下内容的命令来安装 gMSA。
  Install-ADServiceAccount IIS1SvC
<!--NeedCopy-->
如果遇到类似以下的“访问被拒绝”错误,请确保当前成员服务器已添加到 gMSA 的允许列表中,并且随后已重新启动服务器。

-
通过在 PowerShell 中运行类似以下内容的命令来验证您是否已成功安装 gMSA。 如果命令返回 True,gMSA 已成功安装。
  Test-ADServiceAccount IIS1SvC
 <!--NeedCopy-->
步骤 3:启用 gMSA 以访问 Session Recording 数据库和 Session Recording 日志记录数据库
-
为 gMSA 创建登录名。 使用 SQL Server Management Studio (SSMS) 连接到 Session Recording 数据库的 SQL 实例。

使用以下格式命名新登录名:<域控制器的域名>\<gMSA 的名称>。 例如:

-
启用 gMSA 以访问 Session Recording 数据库和 Session Recording 日志记录数据库。
-
通过注册表查找 Session Recording 数据库和 Session Recording 日志记录数据库的名称。 例如,双击以下注册表项以获取值数据。

-
将 Session Recording 数据库和 Session Recording 日志记录数据库的 db_owner 权限授予 gMSA。


注意:
如果您授予 db_datareader 和 db_datawriter 权限而非 db_owner 权限,还必须向 gMSA 授予数据库的执行权限。 例如:
use SR2311 grant execute to [name of the login created earlier] use SR2311log grant execute to [name of the login created earlier] <!--NeedCopy--> -
步骤 3:启用 gMSA 以访问 Session Recording Server
在每个 Session Recording Server 上完成以下步骤:
-
在安装了 Session Recording Server 的计算机上打开 Internet Information Services (IIS) 管理器,将应用程序池标识设置为 gMSA,然后重新启动 IIS。

例如,以下应用程序池标识已设置为 gMSA

注意:
或者,您也可以使用 Windows PowerShell 运行类似于以下内容的命令来设置应用程序池标识:
Import-Module WebAdministration -ErrorAction Stop $webapps = Get-ChildItem -Path IIS:\AppPools foreach ($webapp in $webapps) { if ($webapp.Name.Contains("SessionRecording")){ $Pool = "IIS:\AppPools\" + $webapp.Name Write-Host $Pool Set-ItemProperty -Path $Pool -Name processModel -Value @{userName="AJJ \IIS1SvC$";identitytype=3} } } <!--NeedCopy--> -
在安装了 Session Recording Server 的计算机上打开注册表编辑器,然后向 gMSA 授予 Session Recording Server 的读取权限。
-
找到服务帐户对象类型。

-
输入 gMSA 的名称。

-
向 gMSA 授予读取权限。

注意:
或者,可以使用类似于以下内容的脚本向 gMSA 授予对 Session Recording Server 的读取权限:
$RegistryKey = "HKLM:\SOFTWARE\Citrix\SmartAuditor" $NewAcl = Get-Acl -Path $RegistryKey $identity = "pahl6\IIS1SvC$" $RegistryKeyRights = "ReadPermissions" $type = "Allow" $RegistryKeyAccessRuleArgumentList = $identity, $RegistryKeyRights, $type $RegistryKeyAccessRule = New-Object System.Security.AccessControl.RegistryAccessRule -ArgumentList $RegistryKeyAccessRuleArgumentList $NewAcl.SetAccessRule($RegistryKeyAccessRule) Set-Acl -Path $RegistryKey -AclObject $NewAcl <!--NeedCopy--> -
-
将 gMSA 添加到 Session Recording 存储文件夹并授予其对该文件夹的读取和写入权限。 之后,启用继承并选择 Replace all child object permission entries with inheritable permission entries from this object(将所有子对象权限条目替换为此对象中的可继承权限条目)。


注意:
或者,可以使用类似于以下内容的脚本向 gMSA 授予对 Session Recording 存储文件夹的读取和写入权限以及启用继承:
$path = "C:\SessionRecordings" $NewAcl = Get-Acl $path # Set properties $identity = "pahl6\IIS1SvC$" $fileSystemRights = "Modify" $type = "Allow" # Create new rule $fileSystemAccessRuleArgumentList = $identity, $fileSystemRights, $type $fileSystemAccessRule = New-Object -TypeName System.Security.AccessControl.FileSystemAccessRule $fileSystemAccessRuleArgumentList # Apply new rule $NewAcl.SetAccessRule($fileSystemAccessRule) # enable inherit $isProtected = $false $preserveInheritance = $false $NewAcl.SetAccessRuleProtection($isProtected, $preserveInheritance) Set-Acl -Path $path -AclObject $NewAcl <!--NeedCopy--> -
将 gMSA 添加到 Session Recording Authorization 控制台。
-
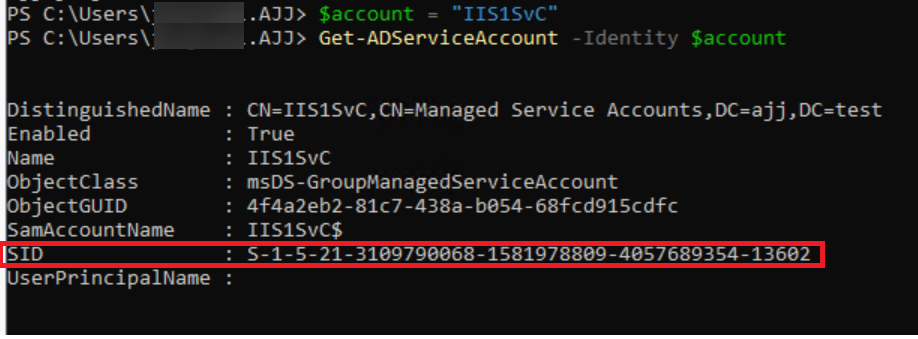
找到 gMSA 的安全标识符 (SID)。
-
将 SID 写入 <Session Recording Server 安装路径>\App_Data 下的 SessionRecordingAzManStore 文件。

-
授予 gMSA 对 App-Data 文件夹的完全控制权限。

-
验证 gMSA 是否已成功添加到 Session Recording Authorization 控制台。

注意:
或者,可以使用类似于以下内容的脚本将 gMSA 添加到 Session Recording Authorization 控制台:
$account = "IIS1SvC" $AccountDetail = Get-ADServiceAccount -Identity $account $accountSid = $AccountDetail.SID.Value write-host $accountSid $path = "C:\Program Files\Citrix\SessionRecording\Server\App_Data\SessionRecordingAzManStore.xml" $doc = [xml](Get-Content $path) $node = $doc.AzAdminManager.AzApplication.AzRole | Where-Object {$_.Name -eq "LoggingWriter"} $element = $doc.CreateElement("Member") $element.InnerText = $accountSid $node.AppendChild($element) $doc.Save($path) <!--NeedCopy--> -